"Compress this photo to under 100KB" sounds like one instruction. It is really two questions, and the second one is the interesting one.
The first question is how hard do I squeeze? JPEG has a quality dial, the dial changes the file size, and you turn it until the file fits. The second question is how many pixels should survive? — and the answer most compressors give is "as many as possible," which turns out to be wrong.
The Image Compressor answers both, for any target from 1KB to 20MB, without your photo ever leaving the tab. This is how.
The Budget Is a Search Problem
There is no setting that means "100KB." JPEG quality is a number from 1 to 100 that controls how aggressively detail is discarded, and the file size that comes out depends entirely on the picture. Quality 80 on a blank wall is a few kilobytes. Quality 80 on a forest canopy is two megabytes. The only way to find the quality that produces your number is to encode, measure, and adjust.
So the compressor searches. It encodes the image, looks at the size, and moves the dial — repeatedly, until the file lands just under the budget with as little unused headroom as possible.
That last part matters more than it sounds. Unused budget is quality you asked for and did not get. If you requested 100KB and the tool hands back 71KB, it has quietly given you a worse picture than your own constraint allowed. An early version of this engine did exactly that, and fixing it is most of what follows.
The Mistake: More Pixels Is Not More Detail
The obvious design starts at full resolution and only shrinks the image when the quality dial alone cannot reach the target. It feels right — you are preserving as much of the original as possible, and only giving up pixels as a last resort.
It produces bad images.
Consider a 12-megapixel phone photo and a 100KB budget. Keeping every pixel means spending 100KB across 12.2 million of them: about 0.065 bits per pixel. JPEG cannot represent a photograph at that rate. What comes back is technically 4032×3024 and visibly ruined — flat blocks where the gradients were, colour bleeding across every edge, mush where the detail was.
Spend that same 100KB on a 1097×823 version of the same photo and you get roughly 0.87 bits per pixel, which is a comfortable, ordinary JPEG. It is smaller on disk in dimensions and dramatically better to look at.
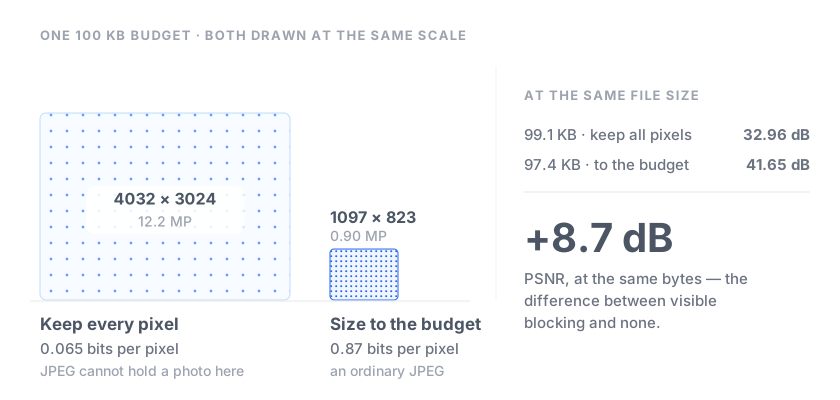
Resolution is not free detail. It is a way of spending the budget, and past a point it is the worst way. So the compressor works out what the budget can actually afford before it starts encoding:
affordable pixels ≈ (target bytes × 8) / 1.2 bits per pixel
That is an opening bid, not a verdict — the search confirms it against the real image and steps down further if the picture turns out to be harder to encode than the estimate assumed. A generous budget changes nothing: ask for 2MB from a 12MP photo and the arithmetic says the full 12MP is affordable, so nothing is given up.
Measured on a test photograph at a 100KB budget, against the same image compressed by the keep-every-pixel approach at the same file size:
| Dimensions | File size | PSNR | |
|---|---|---|---|
| Keep all pixels | 4032×3024 | 99.1KB | 32.96 dB |
| Size to the budget | 1097×823 | 97.4KB | 41.65 dB |
+8.7 dB at the same file size. PSNR is a rough proxy for perceived quality, and a gap that size is not subtle — it is the difference between an image with visible blocking and one without.
The Encoder: Buying Back a Quarter of the Budget
Every browser can already write a JPEG. canvas.toBlob is one call, it is fast, and it is what this tool used to use for everything.
It is also tuned for speed rather than for bytes. MozJPEG — Mozilla's encoder, the same one behind Squoosh — makes different trades: perceptually-tuned quantisation tables instead of the 1992 defaults, and optimised Huffman coding. It is slower, and it is meaningfully smaller.
Measured on this project, same pixels, same quality setting:
| Quality | Browser encoder | MozJPEG | Saving |
|---|---|---|---|
| 90 | 101.4KB | 76.0KB | 25.0% |
| 93 | 131.9KB | 97.0KB | 26.5% |
| 95 | 170.9KB | 119.0KB | 30.4% |
A quarter to a third smaller, for the same picture at the same setting.
The point is not that you get a smaller file. You asked for 100KB; a 75KB file is not a better answer to that question. The point is what the saving converts into: because MozJPEG needs fewer bytes at any given quality, it can hold a higher quality inside the same budget. On the image above, a 100KB budget buys quality 89 from the browser encoder and quality 93 from MozJPEG. Same file size, better picture.
MozJPEG is compiled to WebAssembly and runs in a Web Worker, so the encoding never touches the thread that draws the page — the tab stays responsive while a batch is running. The codec is fetched the first time you compress something and reused for everything after, and if it cannot load at all — blocked WebAssembly, a strict corporate proxy, an old browser — the tool falls back to the browser's own encoder and still produces a file. It gets slightly worse, never broken.
Two Things That Went Wrong
Both of these are the kind of problem you only find by measuring, and both were silently costing quality.
The chroma cliff
MozJPEG has an auto_subsample option that decides how much colour information to discard relative to brightness. Left on, it flips from 4:2:0 to 4:4:4 chroma somewhere around quality 90 — and the output jumps about 45% in size for a single quality point.
For a search trying to land on a number, that is a wall. The measurements looked like this:
quality 89  →   77KB     ← fits the 100KB budget
quality 90  →  113KB     ← overshoots
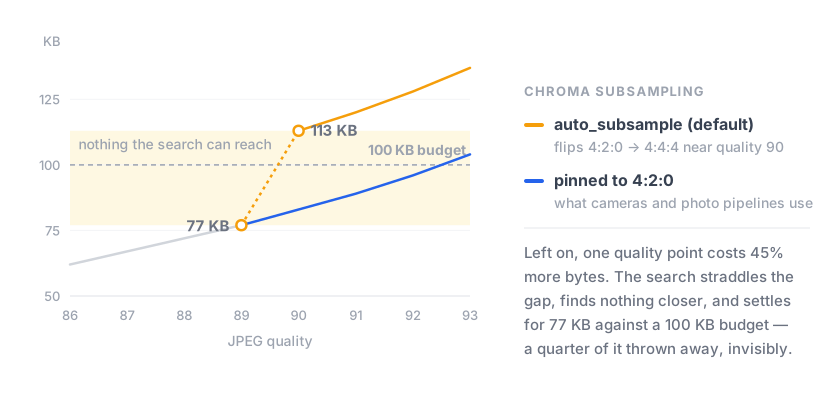
There is nothing in between. The search straddles the gap, cannot find anything closer, and settles for 77KB against a 100KB budget — a quarter of the budget thrown away, invisibly. Pinning chroma to 4:2:0, which is what cameras and essentially every photographic JPEG pipeline use anyway, makes the curve smooth and the search work as intended.
Bisection leaves money on the table
A binary search is the obvious way to find the right quality, and it is the wrong tool here. Bisection converges to wherever the interval happens to halve, which is not where the budget is — it routinely finished 10-15% under target.
But every probe returns a measurement, not just a yes/no. File size against quality is a smooth curve once the chroma cliff is gone, so two measurements are enough to estimate its local slope and jump straight to the quality that should hit the budget, instead of blindly halving. That is a secant method rather than a bisection, and it converges in two or three probes where bisection needed five or more and still landed short.
The engine now lands within a few percent of the budget:
| Target | Result | Budget used |
|---|---|---|
| 20KB | 19.5KB | 98% |
| 50KB | 47.3KB | 95% |
| 100KB | 97.4KB | 97% |
| 200KB | 187.1KB | 94% |
| 500KB | 474KB | 95% |
Above about 1MB the results deliberately come in lower — a 12MP photo at maximum quality is around 1.3MB, and there is simply nothing useful to spend the rest of a 2MB budget on. Filling it would mean adding half a megabyte for no visible difference.
Why Probes Are Rationed
Every probe is a real encode. Measured here, that is roughly 100-300ms at 1 megapixel and about 1.5 seconds at 12. Five probes at 12MP is eight seconds of waiting, per image.
So the probe budget scales with the work: five probes below 2MP, three up to 6MP, two above that. This lines up neatly with what people actually want. Tight budgets — the 20KB, 50KB and 100KB targets that exam portals, visa applications and job forms demand — produce small images, where probes are cheap and every percent of the budget is worth chasing. Generous budgets produce large images, where probes are expensive and the first estimate is already close.
The opening probe is aimed rather than guessed. The fast browser encoder has already reported what a given quality costs in bytes for this specific image, and MozJPEG reliably lands at about 73% of that, so the engine can estimate where the budget sits before spending a single expensive probe finding out.
The Whole Pipeline
- Decode the file in the browser's own image pipeline.
- Estimate the resolution the budget can afford at a sensible bits-per-pixel, never upscaling.
- Bracket with the fast encoder — the browser's JPEG writer finds a quality that fits, cheaply. If the result would be so degraded that artefacts dominate, step the resolution down and try again.
- Refine with MozJPEG in a Web Worker, interpolating from measured sizes, until the file sits just under the budget.
- Hand back the JPEG, with the before and after sizes and dimensions shown per file.
Transparency is composited onto white at step 2, because JPEG has no alpha channel — that is a property of the format, not a choice the tool makes for you.
What It Does Not Do
Worth saying plainly:
- The output is always JPEG. That is what makes precise size targeting possible — a continuous quality dial to search along. PNG is lossless and has no such dial.
- Metadata is not preserved. Compression goes through raw pixels, so EXIF, GPS and colour profiles are dropped. If you want to strip metadata while keeping the original format, that is the Metadata Remover.
- Animation is not preserved. An animated GIF or WebP becomes a single still frame.
- A target can be impossible. Ask for 1KB and you will get the smallest usable file the tool can produce, labelled as such rather than silently pretending to have succeeded.
Nothing Is Uploaded
This is checkable, and you should check it rather than believe it. Open your browser's Network panel and compress something. You will see the WebAssembly codec being fetched the first time, and after that, nothing. No request carries your image, because there is no endpoint to carry it to — the decoding, the resizing, the search and every encode happen inside your tab, on your device.
That is also why it works offline once loaded, and why a 40MB photo does not mean a 40MB upload.
Try it on the Image Compressor, or jump straight to a common target: 100KB, 200KB, 500KB or 1MB.