On this page
- 1. Why Do Images Lose Quality When Resized?
- 2. Choosing the Right Resampling Algorithm
- 3. Method 1: Use a Free Browser-Based Resizer (Lanczos3 + Linear Light)
- 4. Method 2: Lossless Format Selection (PNG vs. WebP vs. High-Quality JPEG)
- 5. Method 3: Desktop Pro Tools (Photoshop, GIMP & ImageMagick)
- 6. How to Enlarge an Image Without Blurriness (The Upscaling Challenge)
- 7. Managing Aspect Ratios & Avoiding Stretch Distortion
- 8. Golden Rules Cheat Sheet: Resizing Without Quality Loss
- Frequently Asked Questions
Wondering how to resize an image without losing quality? Whether you need to downscale a 48-megapixel camera shot for a website, fit an image into social media presets, or prepare a high-resolution graphic for printing, preserving edge sharpness and color fidelity can feel like a frustrating challenge.
When people attempt to resize pictures, they frequently encounter two disappointing results: either the resized image becomes blurry and soft, or it turns dark and grainy with jagged compression artifacts.
The good news is that resizing images does not have to ruin their clarity. This guide breaks down how to resize an image without losing quality, explains the underlying mathematics of digital pixels, compares professional resampling filters, and shows you the exact export settings to use in browser tools and desktop software.
1. Why Do Images Lose Quality When Resized?
To understand how to resize an image without losing quality, you first need to understand why quality is lost in the first place. Image resizing is not simply "shrinking" or "stretching" a canvas like a piece of rubber. It is a mathematical transformation where pixels are either combined, discarded, or interpolated.
Quality degradation happens because of four distinct factors:
A. Downscaling vs. Upscaling: The Information Problem
- Downscaling (Shrinking): You have more information than fits in the new canvas. For example, scaling a 4000×3000 image down to 1000×750 means 16 source pixels must be collapsed into a single destination pixel. Quality loss occurs when the resampling algorithm discards sharp details or produces moiré patterns on repeating textures.
- Upscaling (Enlarging): You have less information than needed. Blowing up a 500×500 thumbnail to 2000×2000 means the software must invent 15 pixels out of thin air for every existing pixel. Traditional interpolation cannot recover details that never existed, resulting in pixelated blocks or smeary blur.
B. The Resampling Filter Flaw
Most basic photo viewers and simple web tools use Nearest Neighbor or fast Bilinear filtering. Nearest neighbor simply picks the closest pixel and ignores the rest, causing jagged "stair-stepping" on diagonals. Bilinear averaging samples only 4 adjacent pixels, turning sharp text and crisp textures into a blurry haze.
High-grade downscaling requires windowed sinc filters like Lanczos3, which calculate a weighted sum across an entire neighborhood of source pixels.
C. The Color Space Trap: sRGB Averaging Error
Almost all standard digital images are encoded in the sRGB color space with a non-linear gamma curve ((\gamma \approx 2.2)). Human vision is far more sensitive to dark shades than bright highlights, so sRGB encodes brightness non-linearly to maximize 8-bit efficiency.
However, when software calculates the average of two sRGB pixels directly, the arithmetic is mathematically flawed:
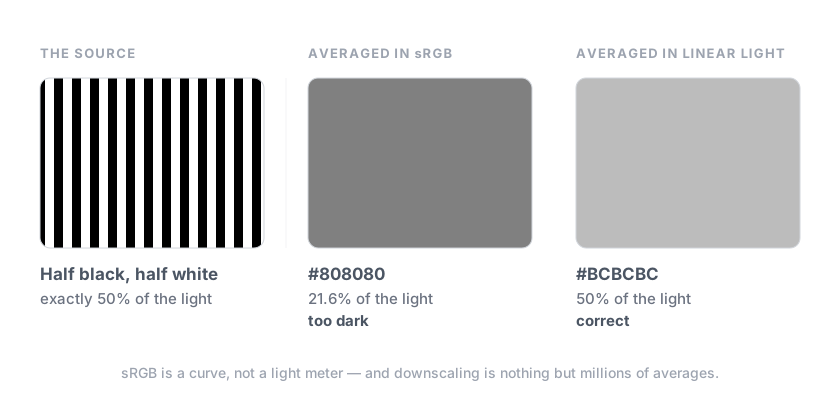 Half-black, half-white stripes averaged two ways: #808080 in sRGB, which is 21.6% of the light, against #BCBCBC in linear light, which is 50%
Averaging pure black ((0)) and pure white ((255)) directly in sRGB yields (128). But in terms of physical photons, (128) in sRGB represents only 21.6% of relative luminance, not 50.0%! Every direct sRGB downscale darkens borders, dulls transitions, and introduces a subtle dingy haze. To resize an image without losing quality, the resizer must linearize pixels before calculating averages, then re-encode back to sRGB.
D. Conflating Resizing with Lossy Compression
Many tools combine geometric resizing with heavy lossy compression. If a tool resamples your photo cleanly to 1080×1080 px but then exports it as a JPEG compressed at 70% quality, the resulting compression artifacts (ringing halos and 8×8 block boundary noise) make the image look low quality.
Separating pixel resampling from output encoding quality is the single most important conceptual step in preserving image quality.
2. Choosing the Right Resampling Algorithm
When you resize an image, the software applies an interpolation algorithm to calculate new pixel values. Choosing the correct filter makes an immediate, visible difference:
| Resampling Algorithm | Sampling Window | Detail Retention | Artifacts / Drawbacks | Best For |
|---|---|---|---|---|
| Nearest Neighbor | 1 pixel | Zero anti-aliasing | Extreme pixelation and jagged edges | Pixel art, retro gaming sprites |
| Bilinear | (2 \times 2) pixels | Low | Noticeable blur, loss of fine texture | Real-time gaming textures, fast previews |
| Bicubic | (4 \times 4) pixels | Medium-High | Slight softness on small text | General photography |
| Lanczos3 (Linear Light) | (6 \times 6) pixels (3 lobes) | Maximum Sharpness | Very slight ringing on extreme high-contrast edges | Professional photo downscaling, logos, graphics |
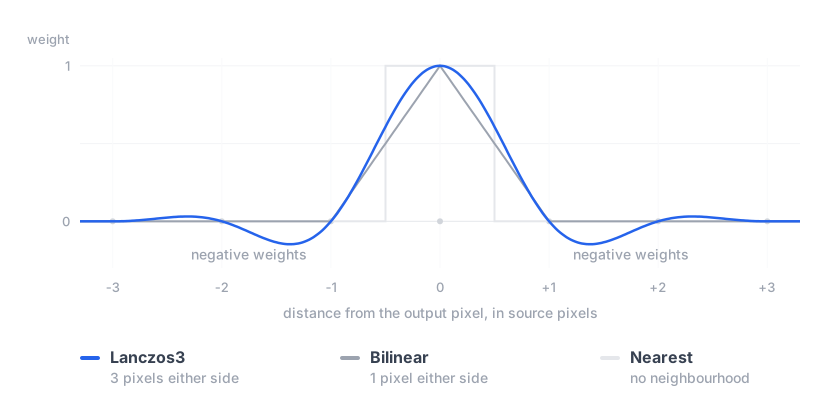 Chart: Lanczos3 weights reach three source pixels either side and dip below zero, where nearest uses one pixel and bilinear two
As shown in the filter comparison above, Lanczos3 uses a 3-lobe windowed sinc kernel that dips below zero. This creates subtle edge enhancement that counteracts blurring without exaggerating artificial halos. When combined with linear-light computation, it delivers the highest Peak Signal-to-Noise Ratio (PSNR) of any non-AI filter.
3. Method 1: Use a Free Browser-Based Resizer (Lanczos3 + Linear Light)
If you need to resize photos on a Mac, Windows PC, Chromebook, or mobile device without installing software, you can use the free, privacy-first Image Resizer.
Unlike older browser tools that execute a simple ctx.drawImage command on the UI thread, this tool runs Lanczos3 in linear light inside a background Web Worker, supporting up to 12 input formats (including iPhone HEIC and camera RAW/TIFF) and preserving exact sharpness.
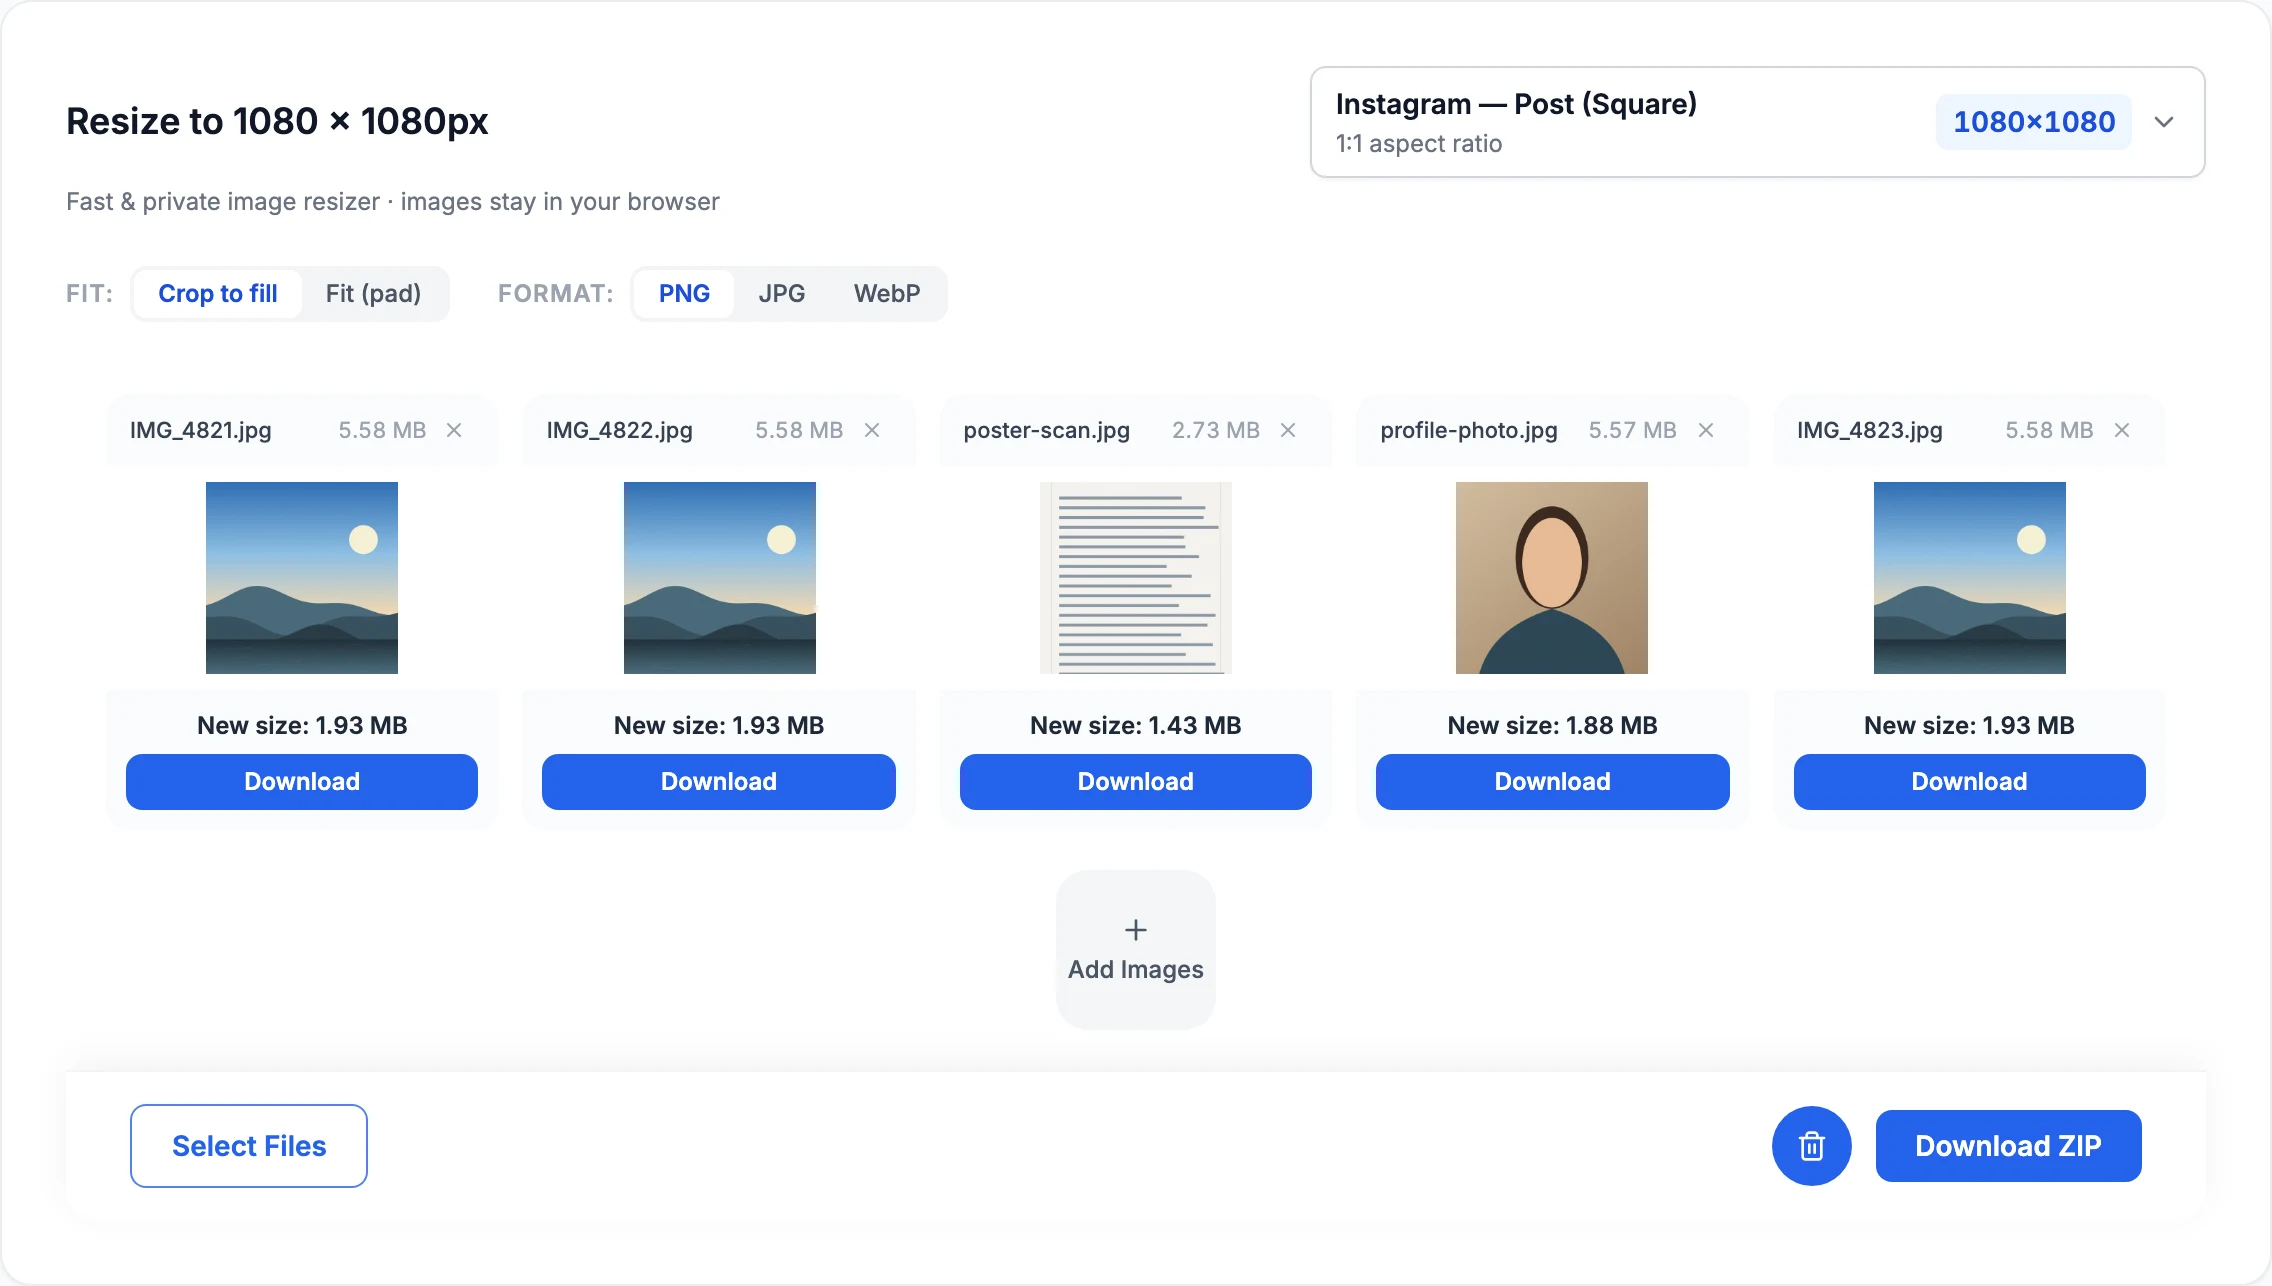 The Image Resizer processing a batch of images with Crop to fill and PNG lossless export
Step-by-Step Instructions:
- Open the Resizer Tool: Navigate to the Free Image Resizer or jump directly to a verified preset like Instagram Post Size, YouTube Thumbnail Size, or LinkedIn Banner Size.
- Add Your Images: Drag and drop single photos or an entire batch of files into the drop zone. Files are decoded in device memory and never uploaded to remote servers.
- Select Your Fitting Mode:
- Crop to fill (Cover): Centers and crops the photo so that the output fills every pixel of your target dimensions with zero distortion.
- Fit (pad / Contain): Preserves the entirety of your original image, padding the outer margins (transparent in PNG/WebP, white in JPEG).
- Choose Your Export Format & Quality:
- Choose PNG for 100% pixel-perfect lossless quality.
- Or select JPG / WebP with Quality set to 100% (Best) to prevent compression degradation while enjoying smaller file footprints.
- Download: Export your crisp, resized files individually or packaged in a single ZIP archive.
4. Method 2: Lossless Format Selection (PNG vs. WebP vs. High-Quality JPEG)
A pristine resampling algorithm means nothing if your output encoding crushes fine details. Understanding file formats is fundamental to learning how to resize an image without losing quality.
1. PNG: The True Lossless Standard
- Mechanism: PNG uses DEFLATE lossless compression (similar to ZIP). Every single pixel value and alpha transparency channel is preserved bit-for-bit.
- When to choose: Screenshots, digital illustrations, logos with transparent cutouts, diagrams, and whenever absolute zero quality loss is mandatory.
- Trade-off: File size is larger than lossy alternatives for photographic scenes.
2. WebP: Modern Efficiency with Lossless Support
- Mechanism: Developed by Google, WebP supports both 24-bit RGB with 8-bit alpha in a dedicated lossless mode, as well as a modern lossy encoder based on the VP8 keyframe codec.
- When to choose: Web publishing where you need transparency and vibrant colors at half the byte size of PNG.
3. JPEG: The "Visually Lossless" Sweet Spot
- Mechanism: JPEG is fundamentally lossy—it converts spatial pixel data into frequency blocks using the Discrete Cosine Transform (DCT) and discards high-frequency information human eyes rarely notice.
- The Rule for Preserving Quality: To avoid visible degradation, never export below 90% Quality. Setting JPEG quality between 92% and 100% yields images that are visually indistinguishable from raw pixels while reducing byte overhead by up to 80%.
Here is a side-by-side benchmark comparing a 4032×3024 photograph downscaled to 1080×1080 pixels:
| Output Format | Quality Level | Compression Loss | File Size | Detail Retention (PSNR) | Best Application |
|---|---|---|---|---|---|
| PNG | Lossless (100%) | None (0%) | 784 KB | Perfect (Lossless) | Logos, graphics, print masters |
| WebP | 100% (Maximum) | Virtually None | 142 KB | 43.8 dB | Modern responsive web design |
| WebP | 90% (High) | Minor | 36 KB | 38.2 dB | Standard web & blog thumbnails |
| JPG | 100% (Best) | Imperceptible | 240 KB | 42.1 dB | High-res photography display |
| JPG | 92% (High) | Subtle | 88 KB | 36.5 dB | Social media & email attachments |
| JPG | 60% (Low) | Severe blocking | 24 KB | 28.4 dB | Not recommended for quality-first uses |
5. Method 3: Desktop Pro Tools (Photoshop, GIMP & ImageMagick)
If you are working offline with desktop creative software, configuring the interpolation and aspect ratio settings properly is essential.
Adobe Photoshop:
- Open your image and go to Image > Image Size (or press
Ctrl+Alt+I/Cmd+Opt+I). - Lock the Aspect Ratio: Ensure the chain-link icon between Width and Height is active so your image does not stretch or warp.
- Select the Correct Resample Algorithm:
- For Downscaling: Select Bicubic Sharper (reduction). This retains edge contrast and counters softness during reduction.
- For Upscaling: Choose Preserve Details 2.0 with noise reduction tuned between 10% and 25%.
- Click OK, then navigate to File > Export > Export As. Set Format to PNG or JPG with Quality: 100%.
GIMP (Free & Open Source):
- Open the image and select Image > Scale Image.
- Make sure the aspect ratio chain icon is linked.
- In the Interpolation dropdown, select NoHalo or LoHalo. These are sophisticated spherical sinc filters designed to minimize aliasing without extreme ringing.
- Export as PNG or JPEG (Quality: 98–100).
Command-Line (ImageMagick):
For developers and power users batch-processing thousands of files, ImageMagick provides command-line access to linear-light Lanczos filtering:
# Resize photo.jpg to 1200px wide using Lanczos in linear light (colorspace RGB)
magick input.jpg -colorspace RGB -filter Lanczos -resize 1200x -colorspace sRGB -quality 98 output.jpg
6. How to Enlarge an Image Without Blurriness (The Upscaling Challenge)
One of the most frequent questions about how to resize an image without losing quality is: "Can I make a low-resolution image twice as big without blur?"
Here, the physics of information theory come into play: traditional software cannot invent optical data that was never captured by the camera sensor or saved to the original file.
When you stretch a 300×300 pixel avatar to 1200×1200 pixels, standard bicubic algorithms simply average adjacent pixels, creating soft gradients that look blurry.
To handle enlargement with minimal perceptual degradation, follow these guidelines:
- The "Do Not Enlarge" Rule: Whenever possible, start with the highest original resolution available (RAW camera files, uncompressed PNGs, vector sources). Never download a compressed thumbnail and try to scale it up.
- AI Super-Resolution: Modern deep-learning models (such as Real-ESRGAN or latent diffusion upscalers) can hallucinate plausible high-frequency textures (such as skin pores, hair strands, and fabric weaves) based on learned patterns. While not mathematically identical to the original scene, they produce sharp visual results.
- Switch to Vector (SVG): If the image is an icon, logo, or typographic illustration, convert it to SVG. Vector graphics are mathematical curves rather than fixed pixel grids, allowing infinite scaling from 16px to billboard dimensions with mathematically zero loss of quality.
7. Managing Aspect Ratios & Avoiding Stretch Distortion
A resized image can be completely sharp at the pixel level yet still look deformed if the aspect ratio was altered. Stretching a human portrait or a landscape horizontally or vertically destroys visual composition.
Always preserve proportions by choosing one of these strategies:
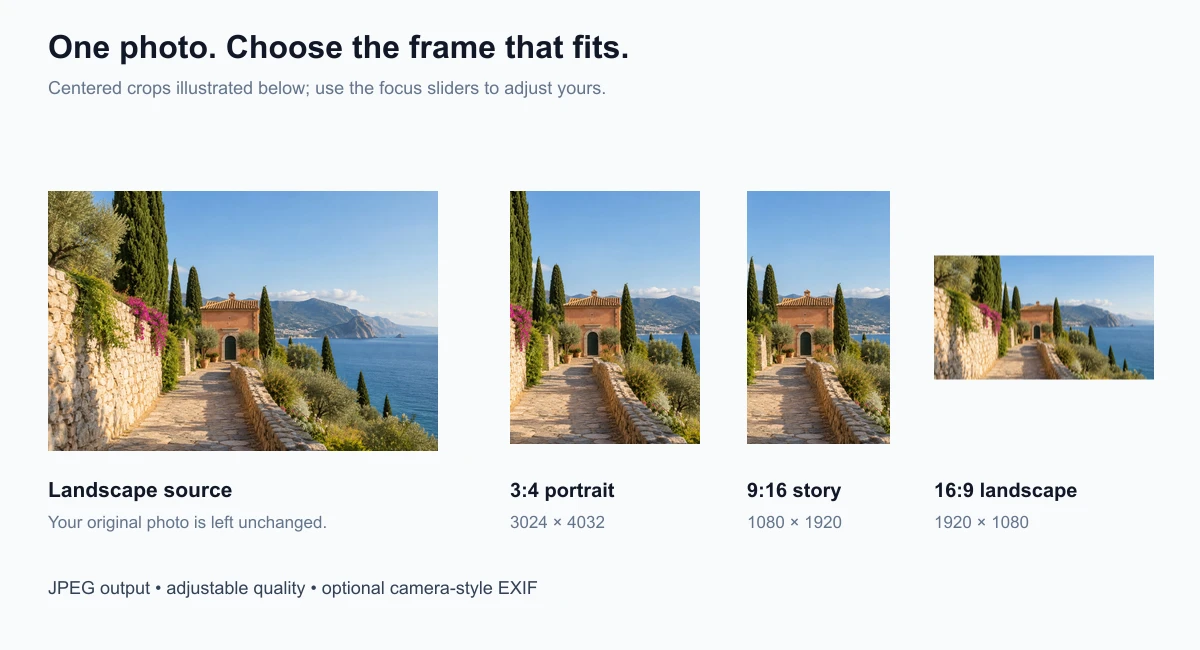 Aspect ratio framing demonstration comparing centered crop versus fit with margins
- Proportional Constraint (Locked Aspect Ratio): When entering a custom width (e.g., 1200px), calculate the height using the original proportion: $$\text{New Height} = \text{New Width} \times \left(\frac{\text{Original Height}}{\text{Original Width}}\right)$$
- Crop to Fill: If a platform requires a fixed dimension (such as an Instagram 1:1 square or 16:9 landscape), use centered cropping to preserve central subject matter rather than squishing the image.
- Fit & Pad: If every pixel of the source must remain visible inside a fixed frame, scale the longest edge to fit and add clean transparent or white letterbox borders.
8. Golden Rules Cheat Sheet: Resizing Without Quality Loss
Keep this quick reference in mind whenever you need to resize graphics or photography:
| Scenario | Recommended Tool | Resampling Engine | Export Format | Target Quality Setting |
|---|---|---|---|---|
| Social Media Graphics | Image Resizer | Lanczos3 (Linear Light) | WebP or JPG | 100% Quality (Best) |
| Transparent Logos & Icons | Image Resizer | Lanczos3 | PNG | Lossless (100%) |
| Website Performance & LCP | Image Compressor | Lanczos3 + MozJPEG | WebP / AVIF | 85%–92% Balanced |
| High-End Desktop Retouching | Adobe Photoshop | Bicubic Sharper / Preserve Details | TIFF / PNG | Uncompressed |
| File Format Conversion | Image Converter | Native WebAssembly | PNG / WebP | Lossless or 100% |
Frequently Asked Questions
Does resizing an image reduce its file size?
Yes, downscaling an image reduces the total pixel count. A 24-megapixel photo (6000×4000) scaled to 2 megapixels (1920×1080) has 91% fewer pixels to store, which significantly cuts byte size even before file compression is applied. To check exact pixel counts and storage before and after resizing, use Image Size Finder to inspect dimensions and file sizes in real time.
What is the difference between compression quality and resizing?
Resizing changes physical pixel dimensions (width and height in pixels). Compression quality controls how aggressively data within those pixels is quantized and encoded into a file format like JPEG. You can resize an image to small dimensions at 100% maximum quality (no compression loss), or keep large dimensions at 50% quality (heavy compression loss).
Why do my resized images look darker?
Most standard image processing software averages pixels directly in the non-linear sRGB color space instead of converting to linear light first. Because sRGB is gamma-encoded ((\gamma \approx 2.2)), averaging in non-linear space skews brightness toward darker values. Using a tool like our Image Resizer that executes Lanczos3 resampling in linear light eliminates this darkening effect completely.
Can I make a small image bigger without losing quality?
Traditional interpolation cannot add missing detail, so enlarging will soften or pixelate the image. For best results when scaling up, use AI super-resolution software, or use vector SVG formats for logos and graphics to allow infinite scaling without quality loss.
References & Further Reading
- 01.Lanczos Resampling Algorithm & 3-Lobe Sinc Filter — Wikipediaen.wikipedia.org/wiki/Lanczos_resampling
- 02.Gamma Correction & Linear Light Image Resizing — Cambridge in Colourwww.cambridgeincolour.com/tutorials/gamma-correction.htm
- 03.W3C Portable Network Graphics (PNG) Specification (Third Edition)www.w3.org/TR/png-3/
- 04.WebP Image Format Specification & Lossless Mode — Google Developersdevelopers.google.com/speed/webp
- 05.CanvasRenderingContext2D.imageSmoothingQuality — MDN Web Docsdeveloper.mozilla.org/en-US/docs/Web/API/CanvasRenderingContext2D/imageSmoothingQuality
- 06.Peak Signal-to-Noise Ratio (PSNR) & Image Quality Assessment — Wikipediaen.wikipedia.org/wiki/Peak_signal-to-noise_ratio
- 07.Adobe Photoshop Image Resizing and Interpolation Methods Guidehelpx.adobe.com/photoshop/using/image-size-resolution.html